Experience from Kids First (KF)
Authors: Abhijna Parigi, Marisa Lim
Maintainers: Abhijna Parigi, Marisa Lim
Version: 1.0
License: CC0 1.0 Universal (CC0 1.0) Public Domain Dedication
Objectives:
This is a cookbook recipe documenting the process of inputting the Kids First data into the C2M2 model to produce
Level 1 tables.This conversion process is also known as the ETL, which stands for Extract, Transform, and Load.
Step by Step Process
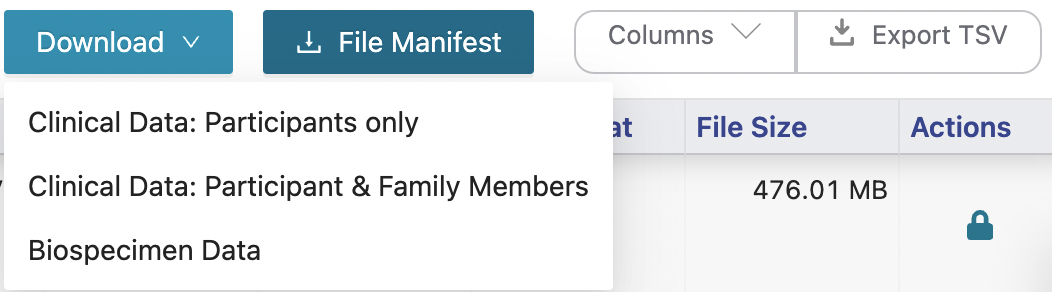
Step 1: Download data from the Kids First (KF) portal
- Visit the KF portal website: https://portal.kidsfirstdrc.org/dashboard
- Log in using your
ORCID credentials(preferred),gmailorfacebookcredentials. - Select the
File Repositorytab on the main navigation bar at the top of the website.

- Download the Kids First Data by:
- Clicking the columns options and select all columns. Then click
Export TSV. - Click
File Manifest. - Click
Downloadand choose the optionBiospecimen Data(3rd option of the dropdown menu)
Step 2: Data pre-processing
- Initial preprocessing: remove all the columns that do NOT have any headers.
- Go to the C2M2 documentation page and look for the diagram labeled "C2M2 model diagram". This diagram is important as it shows the "core tables", colored blue and black, as well as the associate tables needed to map the KF datasets to the C2M2 model. Tables 1-4 shown below are examples of mapping used for the "core tables" and table 5 is an examples used for the associate tables. The number of rows for each table coressponds to the number of unique
identries.
Note: id_namespace and project_id_namespace have repeating values of cfde_id_namespace:3.
Table 1: file.tsv
source: exported TSV file
| C2M2 colnames | KF colnames |
|---|---|
| id_namespace | |
| id | File ID |
| project_id_namespace | |
| project | Study ID |
| persistent_id | |
| creation_time | |
| size_in_bytes | File Size |
| sha256 | |
| md5 | |
| filename | File Name |
| file_format | File Format |
| data_type | Data Type |
Table 2: biosample.tsv
source of Biospecimen ID: exported TSV file
source of Experiment Strategy: File Manifest
source of Composition: Biospecimen Data
| C2M2 colnames | KF colnames |
|---|---|
| id_namespace | |
| id | Biospecimen ID |
| project_if_namespace | |
| project | Study ID |
| persistent_id | |
| creation_time | |
| assay_type | Experiment Strategy |
| anatomy | Composition |
Table 3: subject.tsv
source: exported TSV file
| C2M2 colnames | KF colnames |
|---|---|
| id_namespace | |
| id | Participants ID |
| project_if_namespace | |
| project | Study ID |
| persistent_id | |
| creation_time | |
| granularity | . |
Note: granularity has this repeating value: cfde_subject_granularity:0. persistent_id and creation_time were left empty.
Table 4: project.tsv
source: exported TSV file
| C2M2 colnames | KF colnames |
|---|---|
| id_namespace | |
| id | Study ID |
| persistent_id | |
| creation_time | |
| abbreviation | |
| name | Study Name |
Note: persistent_id, creation_time, and abbreviation were left empty.
Table 5: subject_role_taxonomy.tsv
source: exported TSV file
| C2M2 colnames | KF colnames |
|---|---|
| id_namespace | |
| id | Participants ID |
| role_id | |
| taxonomy_id | . |
:octocat: warning:
role_idhas this repeating value:cfde_id_namespace:3taxonomy_idhas this repeating value:NCBI:txid9606
-
Find and replace KF variables in raw data TSVs with C2M2's controlled vocabulary (CV):
file_format: replace with corresponding EDAM terms from this linkdata_type: replace with corresponding data terms from this link. Look for thedata:tag.anatomy: replcae with corresponding UBERON ID from this linkassay_type: replace with corresponding terms from this link. This was done programatically (in R) for the first pass because there are only 3 possible values.
WGS: OBI:0002117, whole-genome sequencing assay
RNA-Seq: OBI:0001271, RNA-seq assay
WXS: OBI:0002118, exome sequencing assay
Step 3: Find the gold tables
- The gold tables are supplied by CFDE to the DCC and contain information that goes into the blue and green tables. They can be downloaded there.
- If you are using the default Git repo structure for KF trial dataset, ensure that the three gold tables are in the folder titled
KF_sample_C2M2_Level_1_bdbag.contents
Step 4: Add empty association tables
- All association tables (i.e. all lighter blue and grey tables in the diagrams) must be provided in the folder containing the gold tables mentioned in step 3.
- These tables must have the right column names, in the right order, but may remain otherwise empty.
Step 5: Running R script to wrangle data
- Once you have downloaded your data, pre-processed it and made sure the columns are chosen, open up the R script
- Ensure that the path to the raw data tables is set correctly.
- Search (cmd + F) the script for
write.table(). There should be 5 results. At each spot, make sure you edit the path to the folder in which you wish to write your .tsv files. - Run the entire script.
- Navigate to your output folder and check the files.
- If following this Git repo structure, paste all newly created tsvs into the folder called
KF_sample_C2M2_Level_1_bdbag.contents.
Step 6: Building 'green' tables from core entity tables
- This term-scanner script (with modifications to input/output path code) is used to auto-generate the green tables for the C2M2 Model Level 1 model. Currently, this script generates four of the five green tables for Level 1.
- Default paths direct to the HMP example tsv files.
Inputs
-
It currently takes in
biosample.tsvandfile.tsv(two of the core-entity ETL instance TSVs, aka two of the three black tables) from the--draftDir(default is../draft-C2M2_example_submission_data/HMP__sample_C2M2_Level_1_bdbag.contents) -
It will load OBO and ontology files from
--cvRefDir(default isexternal_CV_reference_files):
EDAM.version_1.21.tsv
OBI.version_2019-08-15.obo
uberon.version_2019-06-27.obo
Run script
The term-scanner script is named build_term_tables.py and you can run it like so:
# with default directory locations: change directory to `model`
cd ./model
python build_term_tables.py

# full command, if not using any default paths
./build_term_tables.py --draftDir [path/to/tsv/file/dir] --cvRefDir [path/to/external/CV/ref/files/dir] --outDir [dir/path/where/you/want/outputs/saved]
Run it with -h for command line help.
Outputs
It will produce these four green tables for Level 1: file_format.tsv,data_type.tsv, assay_type.tsv, and anatomy.tsv. The outputs are saved in --outDir (default is ./007_HMP-specific_CV_term_usage_TSVs).
Step 7: After all tables are created
- Double check that all newly created tsvs (NOT raw data) are in the
KF_sample_C2M2_Level_1_bdbag.contentsfolder. - Add the
C2M2_Level_1.datapackage.jsonfile to this folder. - Send the repo to CFDE tech folks.
Conclusion
- This recipe provides an examplar of how to convert a dataset from a DCC, KidsFirst in this example, into the format used by CFDE format for persistence into the DERIVA system.
- Other examples of transformation are available or will be made available as guidance.
What to read next?